20
21
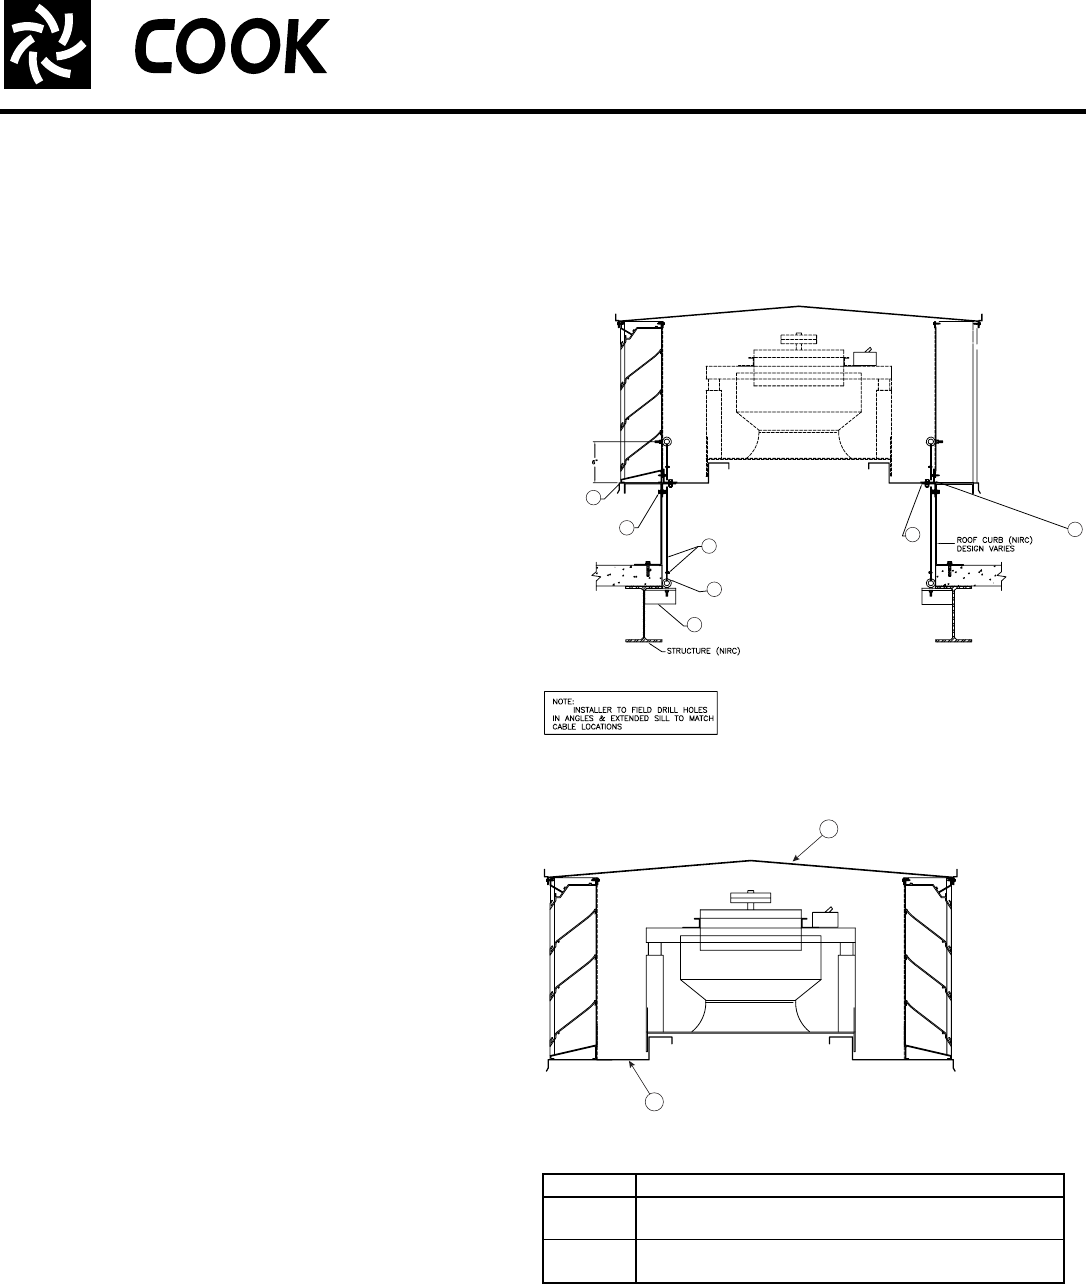
TLCH-D/B Installation Detail Instructions
INSTALLATION, OPERATION, AND MAINTENANCE MANUAL
1
2
3
4
5
6
7
TLCH Supplement A
The unit is shipped in a manner that is stacked together, but the hood
and base may not be attached, to facilitate access for installation. The
installation specifics vary with the design of roof curbs that the
hurricane resistant ventilator is to be mounted on. Modification of the
assembly order may be necessary to have access to the restraint
components and complete the installation. The following requirements
must be met for the installed ventilator to meet the windload and impact
resistance specifications.
1) Complete the installation of an approved roof curb. Recommended
methods are; a) Concrete Surface - ¼”-20 Hilti Kwik Bolt II w/ 2”
embedment, 18” C-C spacing and 6” from ends, provided by others, or
b) Steel Structure - ¼”-20 x 1 hex head bolt w/ locknut and washer, 18”
C-C spacing and 6” from ends, provided by others.
2) The installer is responsible for providing mounting points (5) for the
lower eye bolts on the roof structure. 2x2x1/4” steel angle or similar
material should be used.
3) Install lower eyebolts (6) on anchor points (5) and attach the 1/8” dia.
SS cable (7) (2’ long) to the lower eyebolts with the clamps provided.
4) Attach the upper angle clips (3) (2 x 1.5 x1/8” x 4” long aluminum
angle) to the inside lower edge of the penthouse assembly using two
#12 self-drilling metal screws per angle. Two should be installed on
each side, 15” maximum from the corner (sides less than 15” inside
require one per side).
5) Install the extended sill (2) over the curb and center it. Attach the fan
base to the extended sill if not already done so. Attach using ¼”
fasteners on 15” centers.
6) Install the penthouse (1) over the extended sill. Drill through the
upper angle clip, the extended sill and the lower angle clip in two
places. Attach the angles together using the ¼”-20 x 1 ½ long hex
head bolts and lock nut through the sill base. (Installer to caulk all
penetrations through sill base.)
7) Attach lower aluminum angle clip (4) to the curb using ¼”-20 hex
head bolts and nuts, provided by others.
8) Drill access hole for the 1/8” SS cable in each corner and attach the
cable to the upper eye bolt with the clamp provided. (Installer to caulk
all penetrations through sill base.)
9) Drill access through the sill for the electric supply and complete
wiring to the fan.
10) Proceed with startup procedure.
This publication contains supplemental instructions for Type A TLCH units. Carefully read this publication prior to any installation or mainte-
nance procedure. Type A penthouse assemblies are characterized by a peaked topcap profile, eyebolts in the inside corners for cable
tiedowns, and vertical blade spacing of 5.9 inches. For others, see Type B penthouse assemblies.
Loren Cook catalog, LC, provides additional information describing the equipment, fan performance, available accessories, and specification data. For
additional safety information, refer to AMCA Publication 410-96, Safety Practices for Users and Installers of Industrial and Commercial Fans.
All of the publications listed above can be obtained from Loren Cook Company by phoning (417)869-6474, extension 166; by FAX at (417)832-9431; or
by e-mail at
[email protected]. For info
rmation on special equipment, contact Loren Cook Company Customer Service Department at (417)869-6474. TLCH-D/B Parts List
*Part 20 is in lieu of Part #13 on page 8 of LC IOM.
Part No. Description
20 *
Hurricane resistant penthouse assembly
21
Extended sill/fan base
TLCH Supplement A - January 2007
 (2 pages)
 Manymanuals.com
 Manymanuals.de
 Manymanuals.fr
 Manymanuals.it
 Manymanuals.pl
 Manymanuals.cz
 Manymanuals.es
 Manymanuals-pt.com
Commentaires sur ces manuels